Category Archives: Recipes

Lynn’s Recipes: Too-Easy Trifle

[Updated To Add An Addendum From Lynn]:

Hold the presses on the trifle recipe, Steph! I made a horrible mistake! It’s not strawberries you put on top of the sliced cake in the bowl, it’s sliced peaches!

You can print this heartfelt apology to anyone who already made the recipe. Guess I should stop trying to remember these things and just look them up. I just don’t remember where my moms old recipe books are!

We’ve been asking Lynn to share her favourite recipes (check them all out here!). Here’s a special one for her Too-Easy Trifle dessert:

Something easy and delicious…but plentiful! Be prepared for the kind of leftovers you’ll sneak for breakfast.

You’ll need a good sized glass or pottery salad bowl…maybe a quart size.

INGREDIENTS:

  • One box white cake mix
  • Canned sliced peaches
  • Strawberry jam
  • Bird’s custard powder
  • Fresh strawberries
  • Amaretto
  • Whipped cream

INSTRUCTIONS:

  1. Bake the cake and let it cool.
  2. Cut it in strips, a half-inch wide or thereabouts.
  3. Line the bowl completely with strips of cake..right up to the edge. If you have time, let the cake lining dry out a bit. You want the cake to be able to absorb some liquid without being too soggy.
  4. Whip up the jar of jam with a spoon to make it runnier, and smooth it over the cake lining. Create a nest of jam!
  5. Drain canned sliced peaches…cut the peach slices in half lengthwise to make ’em thinner, and line the cake with them to make a nest of peaches.
  6. Mix up your custard according to the directions and pour carefully into the nest. As it’s setting, drizzle amaretto all around the edge of the cake lining. Put lots on, but don’t make the cake soggy. Allow the custard to set.
  7. Arrange fresh cut strawberries on top of the set custard. Be generous!

This is best when left to “marinate” for awhile, so put the whipped cream on just before serving. Surround the uneven edge of the bowl with whipped cream for a finishing touch.

The amaretto is what makes this so good. You will be sharing this recipe when your guests go for second helpings! Yummmmm!

We Asked Lynn: Her Famous Meat Loaf

We’ve been asking Lynn questions about For Better Or For Worse, knowing she’s a wealth of seldom-heard information about the strip, the Pattersons, and family life.

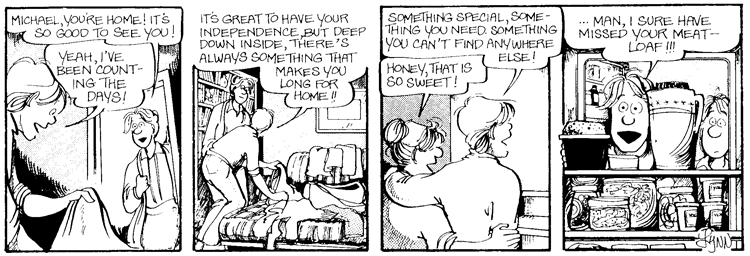
One of the things we wanted to hear more about was Elly’s cooking; her meat loaf in particular became a family favourite, mentioned by Mike more than once in the strip:

Mike missed Elly's meat loaf!

Lynn has her own family recipe, and having tasted the finished product ourselves, we were hoping we’d get her to reveal the secret. [It’s amazing…I’ve been saving one in my freezer for a day when I really need some comfort food –Ed.]

Lynn Responded:

There is no recipe, exactly. It’s a made-up thing which varies in texture and taste depending on what you have to throw into it. Instead of ground beef, you can use venison, moose, or even chicken.

The no-recipe recipe for meat loaf:

The basic ingreds are:

  • a ball of lean hamburger, about the size of your cupped palm.
  • a wad of ground pork, same size.
  • bread crumbs or rolled cooking oats (the amount varies according to how wet the mixture is…you want to make it “packable”).
  • some canned tomatoes, broken up (don’t get the stewed tomatoes–just the whole ones).
  • an egg or two.
  • cut up an average sized whole onion and fire that into the mix.

The spices are usually:

  • salt,
  • pepper,
  • parsley,
  • a bit of chili powder
  • add a heaping teaspoon of Montreal steak spice
  • and Worcestershire sauce…about 5 shakes of the bottle.

Directions:

This is good stuff in a meat loaf, so don’t be stingy. Mix it all in. You want the works to be moist enough to be packed into a glass or metal bread pan. You don’t need to grease the pan.

When the loaves are packed–leaving space along the sides for grease to collect–I take a bottle of ketchup and make a snaking pattern across the tops of the loaves. You might get 3 loaves, depending on the sizes of your pans.

Bake at 350 degrees until the loaves shrink away from the sides of the pans. Should take about an hour…but check. Take out cooked loaves, drain the liquid into a container, and let them stand a few minutes before serving.

Serve with mashed spuds, carrot rounds, and creamed peas. Add apple pie for dessert, and you’ve made one of my mom’s best comfort food dinners ever!

The broth you’ve poured out of the loaves will be mostly fat, but you can cool it in the fridge, take off the fat, and use the broth in soups or gravies. Lemme know how it turns out!

Note from Lynn’s staff: if you’ve frozen one of Lynn’s loaves, thaw it for several hours before you pop it into the oven, or dinner will be (very) delayed. Her meat loaf also tastes great crumbled into pasta sauce.

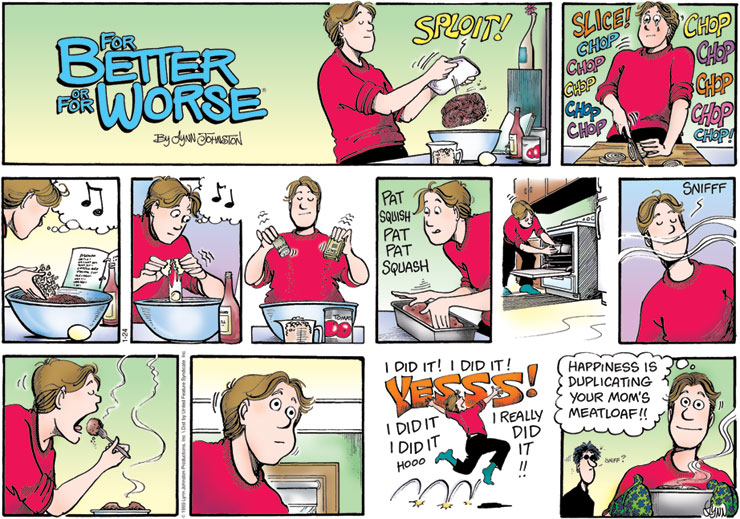
Mike having a good meat loaf day.

Lynn and Laura in the Kitchen

A couple of summers ago, my friend Robin, a chef, stayed for a week in my cottage to escape from the busy kitchen he oversees in a Toronto hotel. After a day of complete relaxation, he asked me if he could cook for me – be my private chef (are you kidding??!!) He said it would be his pleasure to take me shopping, show how he chooses his produce and to find some special things to make. A couple of things I remember about the shopping lesson was: organic IS better, and when you’re buying citrus fruit, weigh the orange or grapefruit in your hand. The more it weighs, the more juice is inside: don’t go by the attractiveness of skin. Makes sense!

Well I had the best private school all to myself. I learned how to cook salmon and lamb with sauces, how to make easy, beautiful salads with poached pears and best of all, we made pastry. I had always been disappointed in the way my pastry turned out and I needed a fool-proof recipe. Now I make pies and quiche and I always have a ball of dough in the freezer – just for “emergencies”.

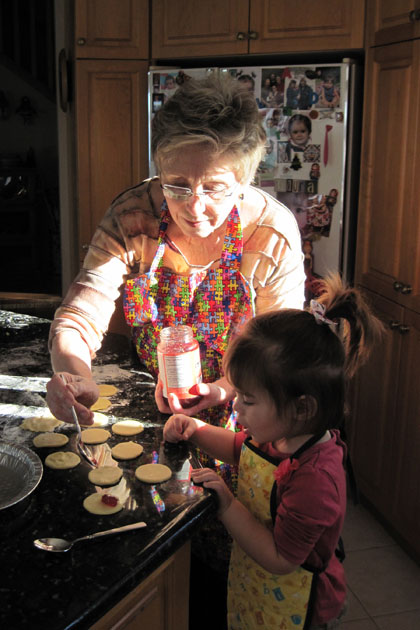
Surprisingly, my little granddaughter Laura loves to help me bake. She’s interested in the process as much as she’s keen to sample the wares. She insists on having on her “appon” and makes sure I’m wearing mine. She knows that after the pie is made and the crust trimmed and ready, she can have all the cuttings. Then we make “jam busters”! This photo is of Laura and me making jam busters a few days before Christmas. She didn’t need to ask why this kid-friendly treat is called a jam buster. The folded over circles of pastry with the most jam in them bust open, and the jam runs onto the baking pan. This browned fruit “taffy” is part of jam-buster goodness and has to be savoured.

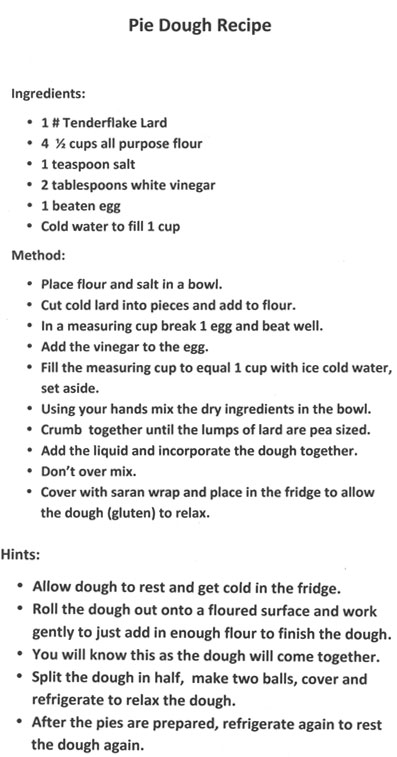
Here’s Robin’s pastry recipe:

Lynn’s Christmas Candy Recipe

Here’s a recipe for easy to make Christmas candy that you can enjoy with your kids. This was a tradition in our family and I look forward to sharing it with grandchildren some day!

Peppermint creams:

All you need is icing sugar, egg white, oil of peppermint and food colouring. I never measure…it’s all by how it FEELS!

Dump about a cup of icing sugar into a bowl. Take an egg white and mix it into the sugar. What you want to make is a dough, so keep adding sugar until you have something the consistency of soft plasticine.

Add a drop or two of oil of peppermint to taste. Be careful, this flavouring is strong! Form the mass into a small log about 1.5 inches in diameter and cut into cubes. Poke your finger into each cube to make a “well”. Into each well, drop a tiny bit of food colouring (leave one cube white for contrast).

Knead each cube until you have the desired colour (kids will love this part!) Roll into balls and place on wax paper – on a cookie sheet. In a few minutes, the surface will dry enough to allow you to press each ball with a fork and flatten it slightly.

Leave the coloured candies over night to harden (might take a bit longer…it varies) then place in a bowl to enjoy.

This candy is as much fun to make as it is to eat! Please tell me how your kids managed with my recipe – I’d love to know.

Lynn J.